
HOW TO WELD PLASTICS – PLASTIC WELDING, REPAIR & FABRICATION WELDING OF RIGID THERMOPLASTICS:
Here is an easy step-by-step guide covering the tips and techniques of “How To” weld plastics with hot air.
1. Plastics Identification:
Observe the Plastic Identification Codes (typically molded into the underside of a part)
Rod Test Kit (RTK) weld test procedure:
- Simply clean an area on the underside of the part to be tested. Ensure you remove any contamination (grease, oils, paints etc.) before attempting his test
- Select a rod from the Rod Test Kit that appears and feels similar to the parent material
- Attempt to weld (approx. 30mm) of the selected rod to the parent material, leaving a tail (30mm long) at 90 degrees to the parent
- Once complete, allow to cool. It is important to note that plastics will not hold full strength until completely cold
- Attempt to remove the rod with a pair of pliers, pulling at 90 degrees to the welded part. If the rod snaps off leaving the material on the parent, you know you have a match
- Repeat the test with another rod selection until you find the correct match
2. Surface Preparation:
As with all forms of welding, cleaning of plastic components prior to welding is as important as any other welding preparation in achieving strong, structural welds. Poorly prepared plastic components will lead to weld failures.
Plastics surface preparation involves ensuring all soils are removed. Any paints, oils, greases and even UV degradation must first be removed prior to welding. With large parts, eg. Bumper bars, washing the part is usually a good start. This will ensure we are removing any atmospheric soils, eg. Mud, Traffic films etc. Use a soft sponge with warm water – don’t use any industrial detergents as these can also introduce film coatings that may also affect the welding results.
Any painted surfaces should also be cleaned right back to the parent material. Paints and other remaining soils can be removed easily using a standard abrasive wheel (sanding disc) with any high speed air drill or electric drill will do the trick. A grinding disc will make quick work of this process, but be warned – plastics yield easily to abrasives, so take care you don’t end up damaging other sections of the part where the wheel can ‘catch’ and ‘drag’ across the component.
This process can create a fair bit of dust, so we recommend the use of a face mask when performing this task. Other methods for preparing plastics include – paint scrapper, sharp blade, clean wire brush…
Once the part has been properly cleaned are prepared, we are now ready for the “Tacking” step.
3. Applying a “V” groove to the weld area:
Welding of plastics components relies on a number of factors –
- Surface Preparation
- Good joint interfaces
- Plastics Identification / Correct welding rod selection
- “V” Grooving, using the rotary burr
- Tacking
- Correct welding temperatures
- Welding technique
A Rotary Burr is used to provide a “V” groove along the weld line. Take care when using the rotary burr, as plastics will yield easily to abrasives. Ensure you use adequate jigging and support, to prevent the rotary burr from ‘digging in’ and running across the plastic being repaired. When “V”ing is complete, you are now ready for the “Tacking” stage.
4. Tacking of plastics:
Tacking of plastics components prior to welding, helps the welder to achieve two things –
- Good joint interfaces AND
- Alignment of the plastic components prior to main welding
The “Tacking Nozzle” can be used to ensure close joint interfaces and alignment of broken parts. Unlike metal welding, where tacking is carried out at the ends of the welding area, Plastic Welding requires “Tacking” to be carried out where ever you intend to place welding rod. Push fit the Tacking Nozzle on the Atlas Plastics Hot Air Tool. Run the tip of the Tacking Nozzle along the weld line, ensuring a slight swaging of the two materials together, closing up the joint interface. Once taking is complete, you are now ready for the main welding stage.
5. Pendulum Welding:
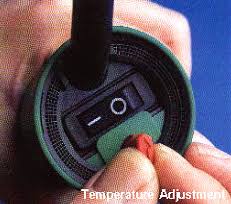
The “Pendulum Welding” technique can be used for short weld runs, or when access is difficult. Fit the standard nozzle (Tip, Pend 1) on the welding tool. Set the required welding temperature on the welding tool using the guide provided. This is carried out using the red rotary dial on the end of all Atlas Plastics Plastic Welders.
Once up to temperature (from cold, this takes approx. 1.5 minutes), select the correct welding rod (see our previous Tech Tip covering “Plastics Identification”). Cut the start of the welding rod to a point. This will help with the initial flow of the weld rod. A pendulum motion is used to evenly heat the parent material and the welding rod. Feed the welding rod into the welding area, while curving the tail of the weld rod away from the welding tool. This will help you control the rod feed during welding and will allow the operator to observe the material flow during welding.

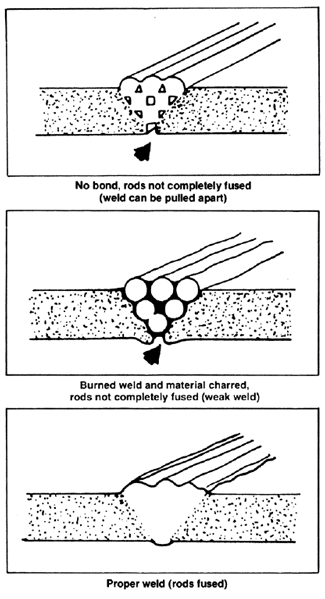
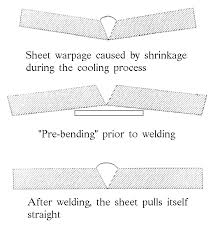
Welding should be carried out in one continuous run along the length of the area to be welded. Welding speed should be adjusted to the point where you observe a slight ‘wash’ or shiny spot at the sides of the welding rod. Ensure that your pendulum motion is providing even heating of both the parent material and the welding rod throughout the weld run. When complete, allow the plastic component to cool completely before attempting to trim or clean up the welding area. This is important as the plastic will not be at full strength until completely cool.
Trimming & sanding can now be carried out if required.
6. Speed Welding:
The “Speed Welding” technique should be used for long weld runs. The term “Speed Welding” gets its name from the fact that it is a relatively fast process compared to that of the “Pendulum Welding” technique.
Fit the standard nozzle (Tip, Pend 1) on the welding tool. Select the correct “Speed Welding” nozzle to suit the corresponding welding rod profile – these are available to suit a range of welding rod profiles. In round profiles, we can supply 3mm, 4mm or 5mm diameters. And in Triangular profiles we supply either a 5.7mm or 7mm Triangular Speed Welding Nozzle.

The Speed Welding nozzles are an easy push fit onto the standard nozzle. Once up to temperature, simply insert the welding rod into the Speed Welding nozzle and apply a downward pressure on the welding rod itself. Apply approx. 5-6 pounds (2.5 – 3 kgs) of downward pressure, forcing the welding rod through the speed welding nozzle and into the weld area. The welding tool will only need to be supported, as the force on the welding rod will move the tool along the weld area with ease.
The “Speed Welding” process is fast, and with time can be a very satisfying process to achieve.
EXTRUSION WELDING
An Extrusion Welder should be used when requiring very high structural strength and/or when welding plastics over 10mm in wall section thickness.
These machines can be supplied with a variety of material outputs. See the full range of Atlas Plastics Extrusion Welders in our shop.
In general, a “hand-held” tool or Hot Iron Welding Tool (available in plastic welding kits), is also usually purchased together with an extruder welder, to enable “tacking” of the parent materials prior to the main welding.
ADD IN Extrusion Welding Video
Hot WELDING Iron
A Hot Welding Iron can be used in place of a hot air gas welder when working with reduced funds or in certain hard to reach areas. Usually it is a little tricky to learn how to use this device but with patience one can learn to make nice looking welds similar to any other technique. A Hot Welding Iron can be used to perform the initial tack welding of the two parts together. It can also be used for smoothing rough looking welds.
A more typical application for the Hot Welding Iron is to work plastic into the steel reinforcing mesh that is cut and bent to shape and placed over a tear or cut in the original broken device to strengthen the plastic weld and bond.
Details of the Plastic Welding Hot Iron Repair Technique
Once up to temperature, place the pre-cut mesh over the area of repair. Place the Hot Welding Iron on the mesh and start heating the mesh and parent plastic. As the mesh heats, the plastic will start melting into the mesh. Continue this heating process until approx. 1/16” to 1/8” of plastic is above the mesh. Next, allow the area to cool before adding more plastic welding rod to the area. When adding plastic welding rod, ribbon style rod or round rod can be used. Just be patient while melting the plastic welding rod to ensure that you do not overheat the weld or burn the plastic. Alternating between several thin layers and allowing them to cool is preferable over adding one thick poorly heated layer. This poorly heated layer could cause poor homogeneity and lead to premature cracking and failures.